 Save
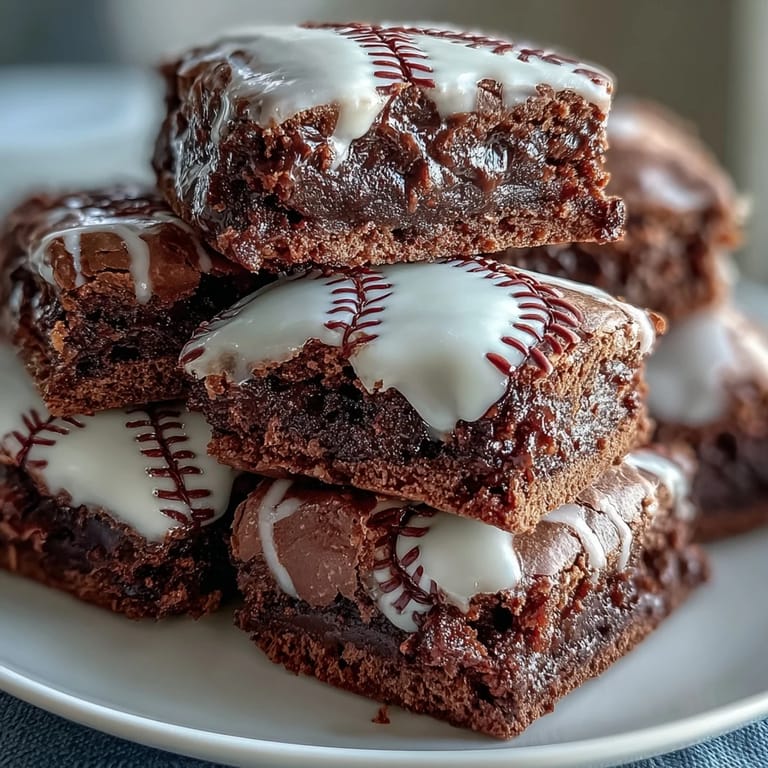
Save My nephew's Little League coach called me three days before opening day with a desperate plea—they needed team snacks, and his mom had just broken her arm. I stood in my kitchen that Saturday morning, thinking through every dessert I could make in bulk, when it hit me: brownies shaped like baseballs. Thirty minutes later, I had tiny fudgy bites piped with white icing laces cooling on racks, and by game time, those brownie baseballs were the unofficial mascot of the season. Now they're my go-to move whenever there's anything sports-related on the calendar.
I'll never forget watching my nephew's face light up when he saw the brownie baseballs at the snack table. His whole team got into it, comparing which ones had the "best laces," and suddenly this little dessert became part of their team ritual. By the end of that season, parents were texting me asking for the recipe, and I realized I'd accidentally created something that actually mattered to these kids.
Ingredients
- Unsalted butter: Start with quality butter—it melts smoother and the flavor really shines through in something this small.
- Semisweet chocolate chips: Don't skip the melting step; these need time to get silky, and those 30-second bursts actually prevent scorching.
- Granulated sugar: This is your sweetness anchor, and it dissolves beautifully into the warm chocolate.
- Large eggs: Room temperature eggs mix in more smoothly, though I've never actually remembered to warm mine and it's fine.
- Vanilla extract: A teaspoon transforms the chocolate from one-note into something more interesting and warm.
- All-purpose flour: Keep this light—you're folding, not stirring, because overmixing turns these into tough little hockey pucks.
- Salt: This tiny pinch wakes up the chocolate and balances the sweetness in a way you won't consciously notice but will definitely taste.
- Powdered sugar: For the icing, sift it if you have time, but honestly I just break up the lumps with a fork and move on.
- Milk: Start with less and add gradually—you want icing that's thick enough to hold a line but actually pipeable.
Tired of Takeout? 🥡
Get 10 meals you can make faster than delivery arrives. Seriously.
One email. No spam. Unsubscribe anytime.
Instructions
- Preheat and prepare your tin:
- Get your oven to 175°C and get those mini muffin cups ready—grease them or slide in paper liners so you can actually get these little guys out when they're done. I learned the hard way that sticky brownie bites will tear without liners.
- Melt chocolate gently:
- Combine butter and chocolate chips in a microwave-safe bowl and melt in 30-second bursts, stirring between each one until everything's smooth and glossy. Rushing this step or letting it get too hot will make your chocolate seize up and grainy.
- Build your batter base:
- While the chocolate's still warm, whisk in sugar until it starts to look a bit sandy, then add eggs one at a time, whisking well after each one so they actually incorporate. Pour in vanilla and you've got the foundation of something really good.
- Fold in dry ingredients carefully:
- Sprinkle flour and salt over the chocolate mixture and fold gently with a spatula—this is the moment that matters, because overmixing develops gluten and hardens these bites. You want them fudgy, not cakey.
- Fill and bake:
- Divide batter evenly among the cups, filling each about three-quarters full, then slide into the oven for 16 to 18 minutes. They should look slightly underbaked when you pull them out—a toothpick will have moist crumbs clinging to it, which is exactly what you want for that fudgy center.
- Cool with patience:
- Let them sit in the tin for 5 minutes so they firm up enough to handle, then transfer to a wire rack to cool all the way through. This is when you can finally breathe and get yourself ready for decorating.
- Mix your icing:
- Whisk powdered sugar with a teaspoon of milk and vanilla, adding more milk just a tiny bit at a time until you've got something thick enough to pipe but not so stiff it's impossible to work with. The texture should feel like it's got some backbone.
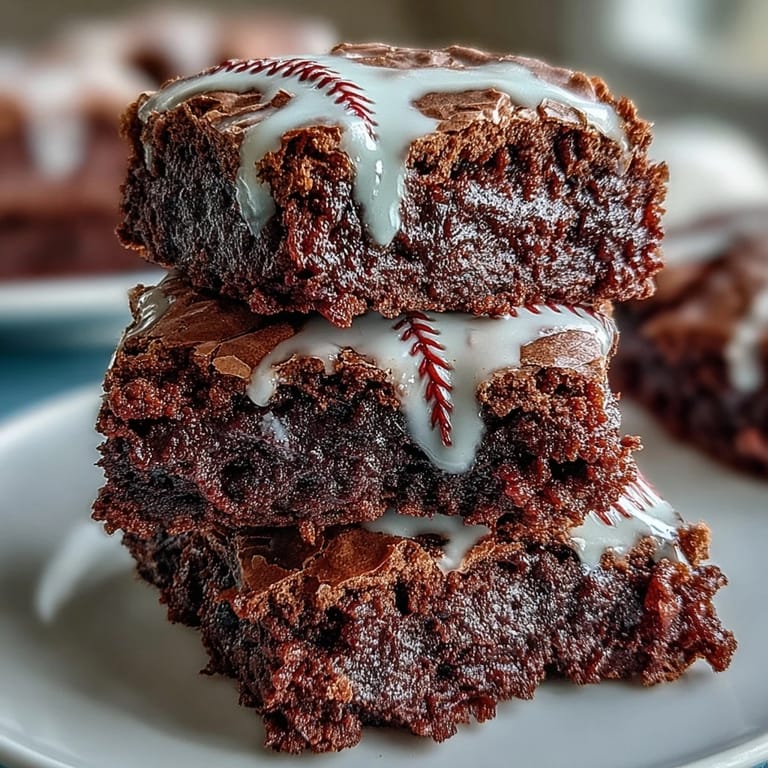
- Pipe the laces:
- Load your icing into a piping bag and pipe two curved lines across each brownie bite to create the seam, then add little perpendicular lines across those curves to mimic real baseball stitching. It doesn't have to be perfect—slightly wonky stitches actually look more authentic and handmade.
- Set and serve:
- Let the icing firm up for at least 10 minutes before you move them around or stack them. These little brownies are ready to go whenever you are.
 Save
Save There's something magical about turning a simple brownie into something that makes people smile before they even taste it. That little detail—the icing laces—transforms a good dessert into something memorable, and that's really what cooking is all about.
Storage and Make-Ahead Tips
I usually bake these the day before I need them and store them unfrosted in an airtight container at room temperature. The night before serving, I pipe on the icing, which takes maybe 15 minutes and lets me hand them off looking completely put-together. They hold up beautifully for three days, though they rarely last that long once people realize they exist.
Flavor Variations That Actually Work
Once you nail the base recipe, you can play with it. I've added mini chocolate chips to the batter for extra richness, stirred in chopped walnuts for texture, and even tried a double-chocolate version by swapping cocoa powder for some of the flour. If you want to get wild with the icing, a tiny drop of red food coloring makes the laces actually look like real baseballs, and I've had success adding almond extract instead of vanilla for a subtle depth.
Why These Work for Parties
Brownie bites are portion-controlled, which means nobody feels guilty grabbing a few, and they're small enough that you can arrange them on a platter without them taking over the whole table. The baseball theme is flexible enough for actual sports events, kids' parties, or just anyone who appreciates a themed dessert that doesn't take themselves too seriously.
- Pro move: make a big batch and freeze them unfrosted for up to a month—thaw and decorate whenever you need a last-minute crowd-pleaser.
- These work just as well for baseball-themed baby showers, team celebrations, or even just because you're having people over and want something special.
- Set them on a tiered stand or baseball-themed platter to make them the centerpiece of your dessert table.
 Save
Save These brownie bites have become my reliable answer to the question, "What should I bring?" Because they're fudgy, they're cute, and they remind people that food is supposed to be fun. Make them, watch people's faces, and enjoy being the person who thought of this.
Recipe FAQs
- → How do I get the white icing to pipe neatly?
Mix powdered sugar with just enough milk to create a thick but smooth consistency that’s easy to pipe without running.
- → Can I make the brownie bites ahead of time?
Yes, bake and cool the bites, then pipe icing just before serving for best freshness and appearance.
- → What’s the best way to prevent overbaking these bites?
Check for moist crumbs on a toothpick inserted after 16 minutes and remove once this stage is reached to keep them fudgy.
- → Can the icing be tinted for different designs?
Absolutely, adding a drop of food coloring to the icing allows for creative designs beyond the traditional look.
- → What tools are recommended for shaping and decorating?
A mini muffin tin for baking and a piping bag or small zip-top bag with a tiny tip for icing application work best.